# Sales & Orders (POS)
24 pages of the PizzaGest manual grouped by functional area.
# Choose order
Once we have clicked on the Menu option **Consult** or **Orders-\>Check
Orders**, a screen like the one we can see below will appear:
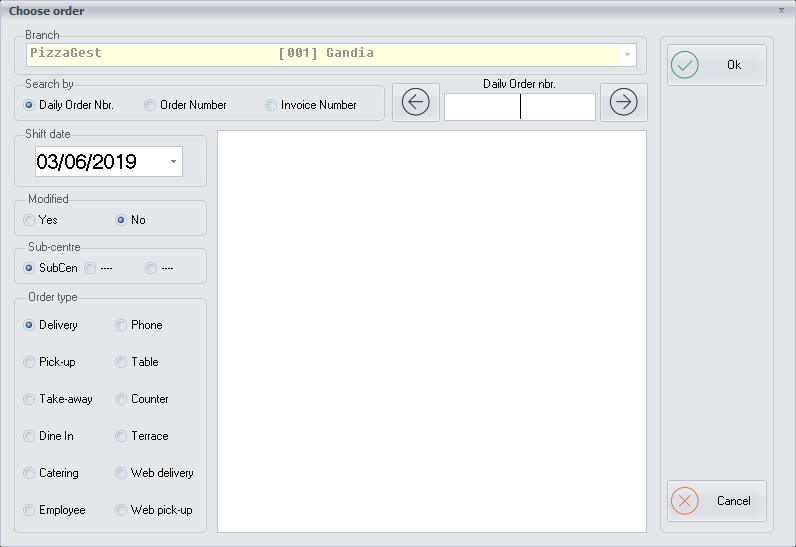
The order numbers are generated randomly so in that way nobody
(especially from the competition) can know when we take an order, how
many orders we have generated daily. Delivery orders will have a number
between 500 and 600 and the other types of orders between 1 and 100.
We can search for an order in three different ways:
**Daily Order Number**:
We will choose within the Shift day, with the help of the
calendar, the day we want to see the orders.
We can choose if the orders were modified.
And finally we will mark the order type of the order we want to
choose.
**Order Number**:
We can search for a specific ticket, if we enter the ticket number that
PizzaGest has generated internally.
**Invoice Number**:
When choosing this option, we will have to enter the invoice number.
Once we have chosen the ticket or invoice, we will press the **OK**
button and we will go to the next screen **Check
Order**
The **Cancel** button allows us to exit of the screen without making any
changes.
# Check Order
Once we have chosen the order that we want to consult, from **Choose
order**, we
will see a screen like the one we can see below:
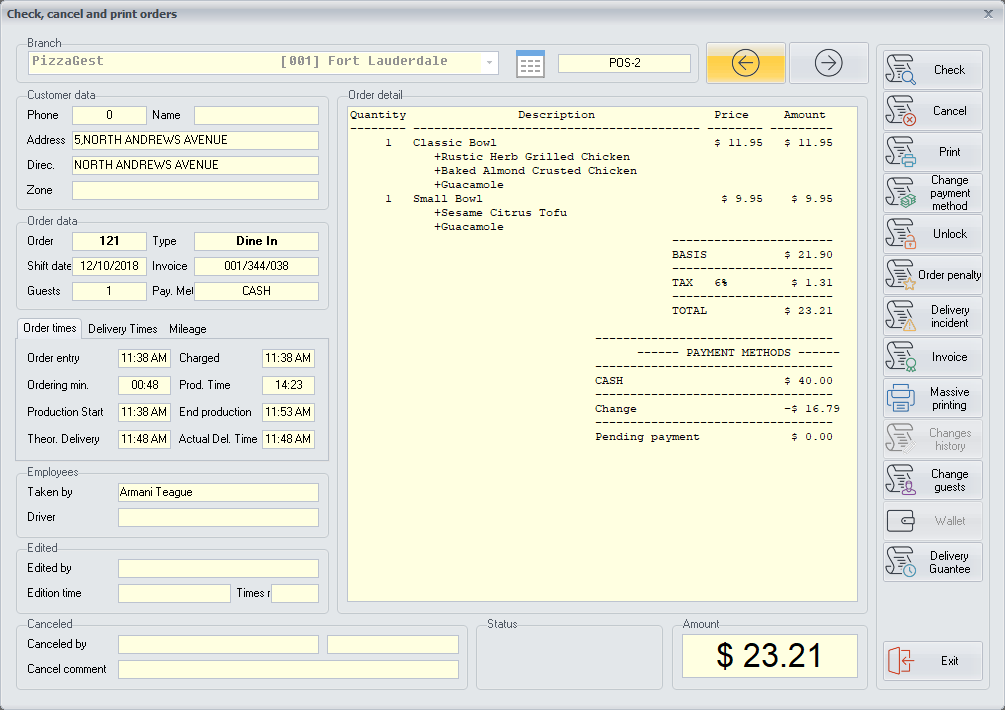
On this screen we will see all the details of the order:
-The **data of the branch** from where the order was placed and the
computer from which the order was taken.
-The **data of the customer** who placed the order.
-The **details of the order**: Order number, Invoice, Type of order,
Shift date, Guests and Payment method.
-The **production times** of the order.
-The **times of delivery** of the order, in case it is a delivery order.
\- The **mileage** in case it is a delivery order, where it will appear:
The **theoretical kilometers**, which are calculated by Google.
The **actual kilometers**, which are calculated by the application for
drivers.
You can also change the mileage with the **Change Mileage** button that
will ask us to enter the actual kilometers and the theoretical
kilometers.
You can also change the driver with the **Change driver** button through
the **Choose
Employee**
screen and it will appear the tip that the customer left in the delivery
order.
-The **data of the Employee** who has taken the order and the driver if
the order was a delivery order.
-The **Edition or Cancelation data** of the order, in case the order has
been edited or canceled.
In the upper line, we have the option to move to the left or right with
the arrow icons, and we will move to the previous or to the next orders
which are of the same **type of order**.
------------------------------------------------------------------------
In the right part, we have several buttons which allow us to make
different functions:
We have to take into consideration that to use some functions, the
system will ask us to enter the code and password of the authorized
user, this will depend on the **Access
Level** of
each employee.
**Check**: It allows us to return to the previous screen **Choose
order**
**Cancel**: We will have to confirm that we want to cancel the selected
order and then we can cancel the order from the screen **Order
Cancellation**
**Print**: It allows us to print the customer’s ticket or the driver’s
ticket if it is a delivery order. Also, if the ticket is from the
current day, it will ask us if we also want to reprint the kitchen
chits.
**Change payment method**: To change the payment method, we have to
click on this button and the **Charge
Order**
screen will appear where we can change the payment method. This option
can be useful, if we have already ended the order and we want to change
the payment method without canceling the order and doing it again.
**Unlock**: This button allows us to unblock an order that has been
taken from another device, in order to modify it.
**Order penalty**: It allows us to make a discount to a ticket already
closed, from the **Order
penalty** screen (For
example if in a delivery order, the deliveryman forgets to carry the
drinks, when he returns he will discount it from the order).
**Delivery incident**: With this button we can add a delivery incident
if it has not been introduced when the driver have come back from the
delivery order in the
**Delivery**
screen. When you click on the button, it will ask us for confirmation
that we want to insert an incident in the order and once confirmed, we
can insert the incidence through the **Delivery
Incident**
screen
**Invoice**: To create an invoice from a ticket that already exists, we
have to click on the **Invoice** button and if we do not have the
customer linked with the order, the **Search for
Customers**
screen will appear. If the customer of the invoice already exists in our
database we will select it and press the **Ok** button, otherwise we
will click on **New customer** button and we will add the customer
through the **Customer
Management**
screen. Once the customer has been selected or if we already have the
customer linked with the order, the **Draw Up an
Invoice**
screen will appear. It must be taken into consideration that the
customer data that will appear on the invoice will be the data that has
been entered in the **More data** tab through the **Customer
Management**
screen.
**Massive printing**: We can reprint a large number of tickets, through
the **Massive
Printing**
screen.
**Changes history**: It will allow us to see all the changes that have
been made in the order. These changes will appear in the Edited
section, where it will appear the number of times the order was edited,
the edition date and the employee who has made each modification. We can
move from one modification to another with the arrow icons which are
above.
**Change guests**: This button allows us to modify the number of guests
of the order, as long as it is not a Delivery or Pick-up order.
**Delivery guarantee**: We can set the maximum discount to refund to the
customer, choosing the order types that we want, in case the order does
not arrive on time, through the **Insert/Modify
Branches**
screen.
# Open cashdrawer
Una vez hayamos pulsado en el icono de las monedas o hayamos accedido a
través del Menú **Pedidos-\>Abrir Caja**, aparecerá la siguiente
pantalla:

Esta opción permite al empleado abrir el cajón con la obligación de
introducir el código del empleado y pulsando **Aceptar**.
Todos las aperturas del cajón quedan registradas en la pantalla
**Consultar Arqueos de
Caja**
Con el botón **Cancelar** podemos salir de la pantalla sin hacer ningún
cambio.
# Delivery Orders
Once we have clicked on the Menu option **Orders-\> Order Status** or on
the **Delivery** icon in the main Menu, a screen like the one we can see
below will appear:
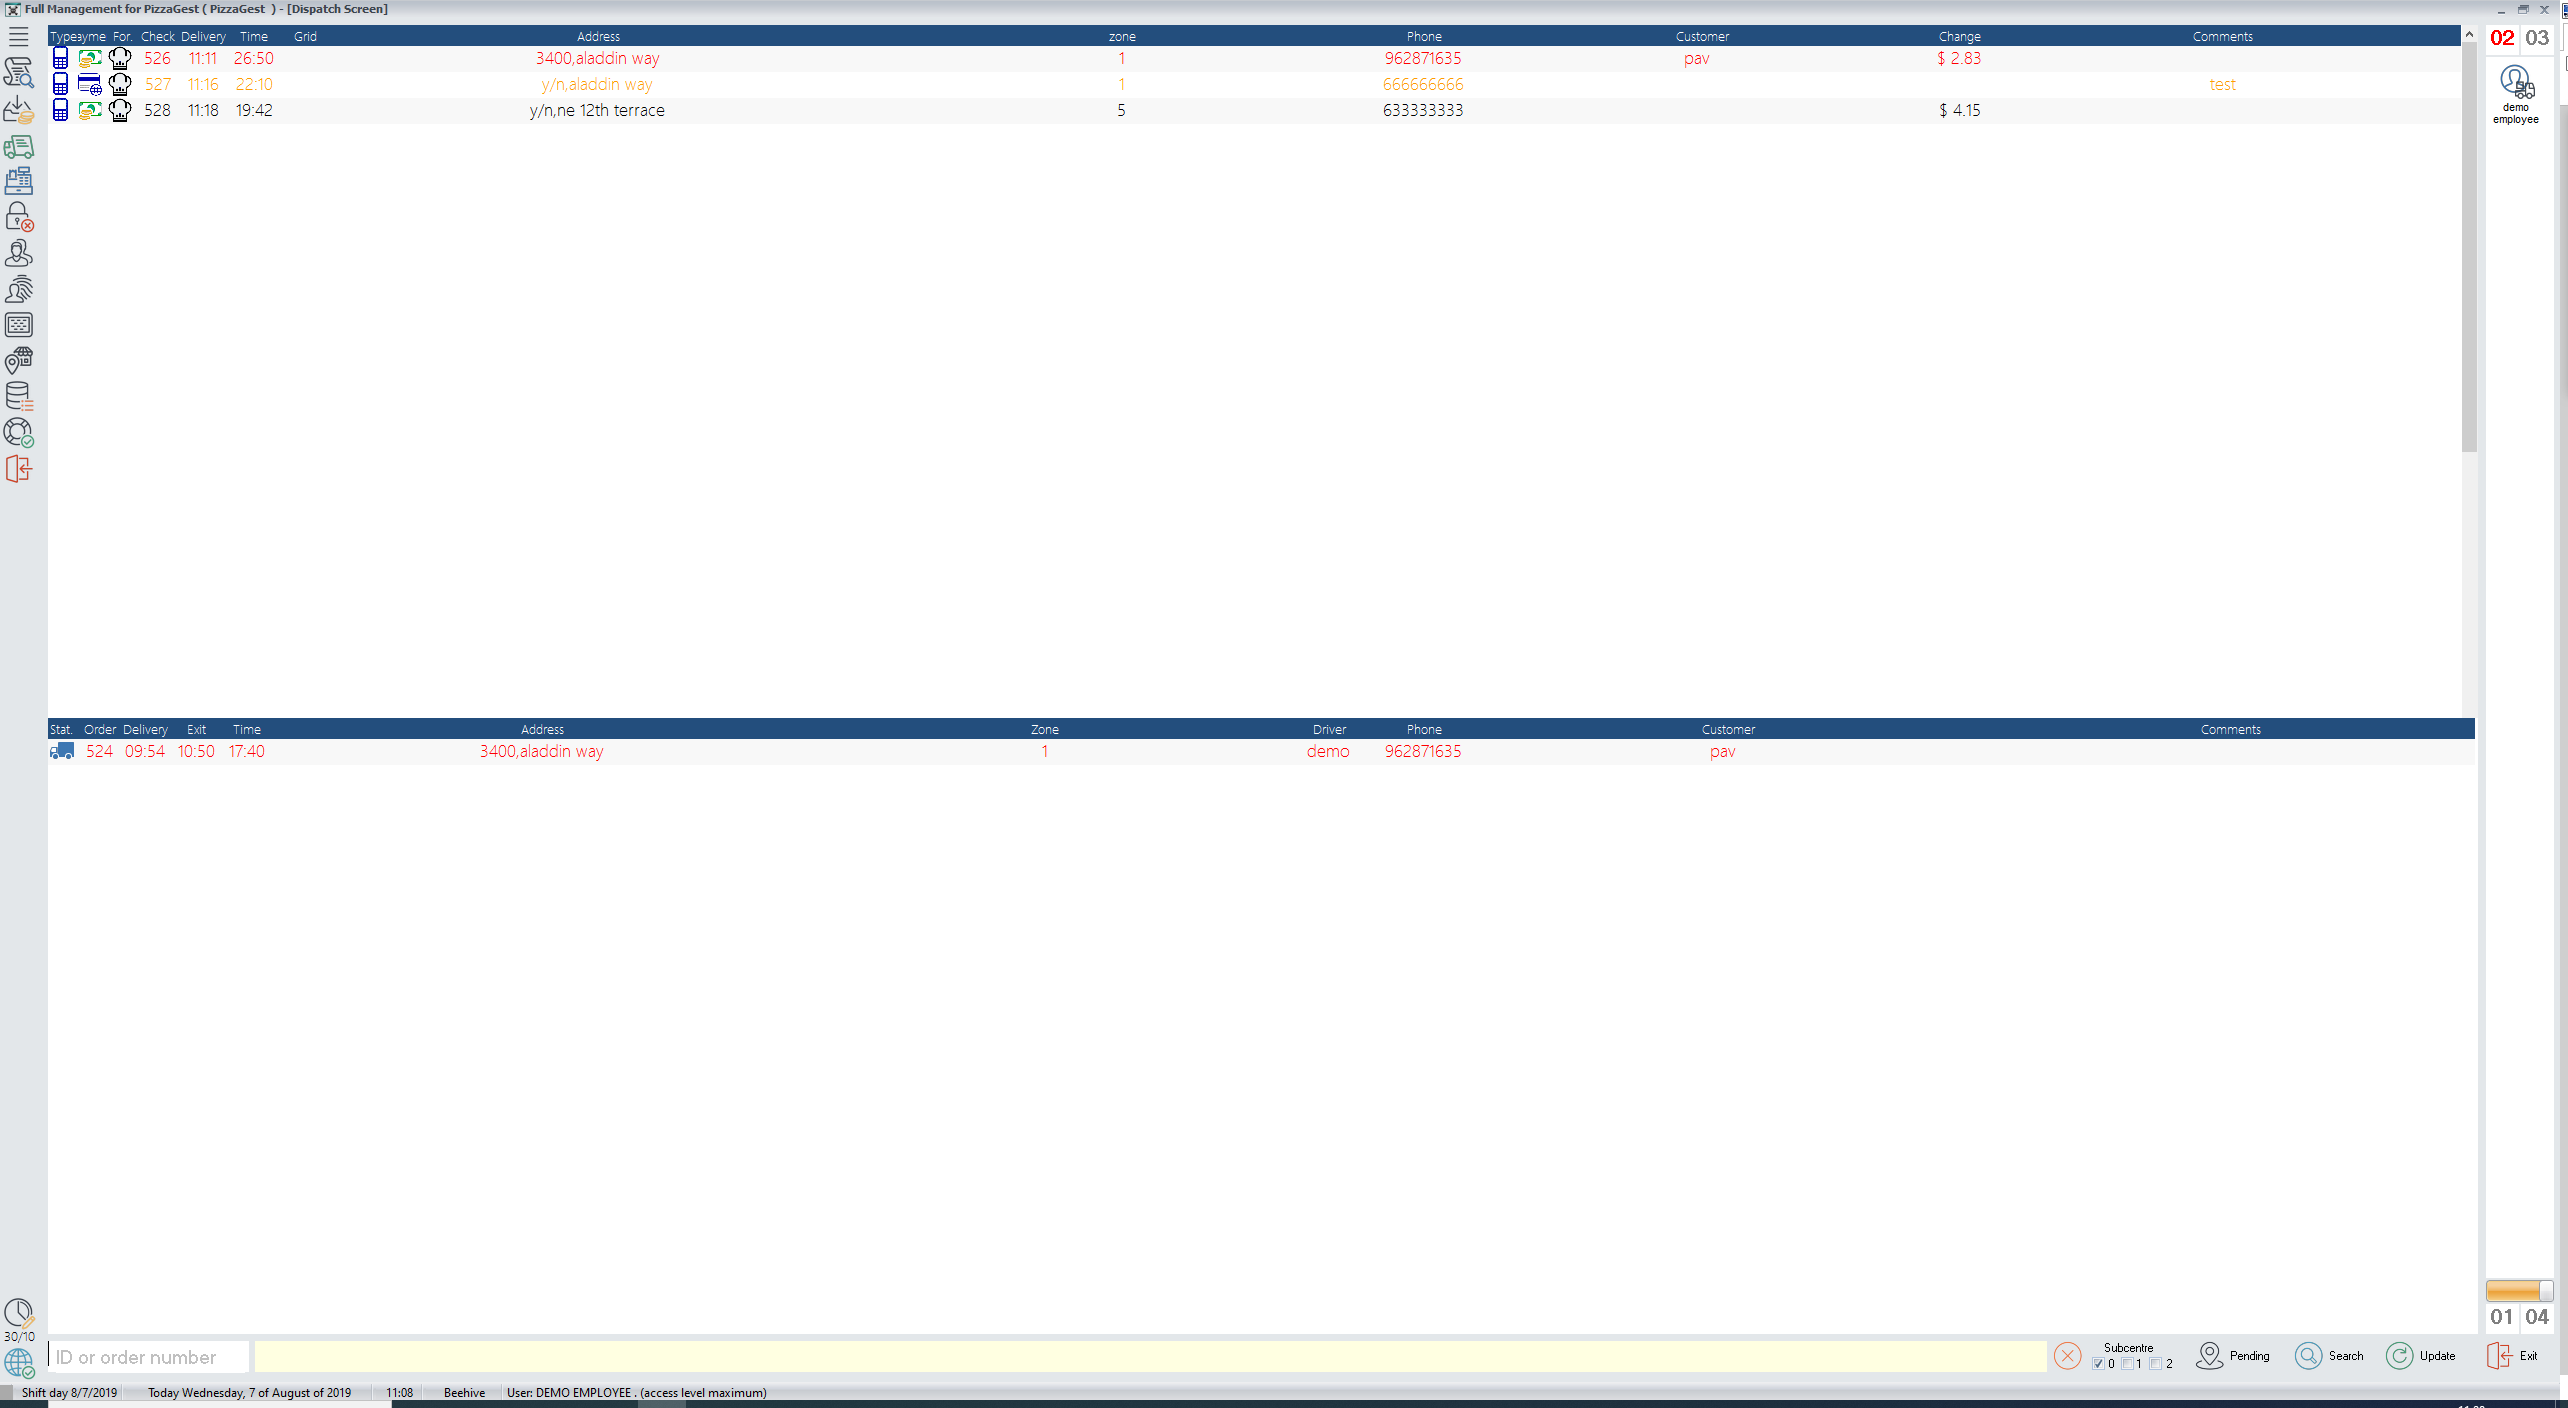
This screen is divided between the **Pending Orders** that will appear
at the top and the **Orders on delivery**, which will appear at the
bottom.
In the **Pending orders**, we can see the following data of each order:
**Type**: It will indicate the source of the order, if the customer has
called us by phone, if it has been placed from the Call Center or
through the web.
**Payment**: We can see the payment method that the customer will use,
whether from cash, credit card, etc.
**Status**: Here we will see if the order is still being produced in the
kitchen or if it is already finished.
**Check**: It will indicate the order number.
**Delivery**: It will be the delivery time, depending on how we have set
the **Delivery
minutes** on
the **Clock** button located in the lower left part of the screen.
**Time**: It is the length of time in which the order is being produced
since the order request.
**Address**: It will show the customer address.
**Zone**: We can see the
**Zone** to which
the customer address belongs.
**Phone**: It will show the customer phone.
**Customer**: It will show the customer name.
**Change**: Here we can see the change which has to take the driver to
refund the customer in case that the method payment is cash.
**Comments**: It will show the delivery comments that we have written
through the **Place an
Order**
screen.
In the **Pending orders**, we can see the lines of each order in three
different colors:
Black: The order is in of delivery time.
Orange: The order is close to exceed the delivery time.
Red: The order is out of delivery time.
It will depend on how we have set the **Delivery
minutes** on
the **Clock** button located in the lower left part of the screen.
------------------------------------------------------------------------
When the order status shows that it is already produced or we are told
from the kitchen staff about it, it will be the time to assign the order
to a driver.
In the **right top** we can see the **total number of pending orders**
and **in red the orders below critical time**. On the other hand, in the
**right bottom** we can see the **total number of orders** and **the
number of orders in delivery**.
To assign one o more than one order to a driver, we have first to select
one or more order lines and they will be marked with a blue background.
Then, we have to select a driver from the list of drivers on the right,
and the orders will be automatically assigned to the driver and they
will move down to the **Orders in delivery**. The drivers are sorted
from top to bottom, starting at the top with the drivers that have been
available for a longer time.
Once we have selected a driver, the following options will appear:
**Come back**: When drivers come back from delivering the order, they
have to select this option in order to be available, although they are
able to assign themselves an order even if they have already an order
assigned. When drivers choose this option, the system will ask them if
they want to enter any **Delivery
Incident**.
We can set the **minimum time to come back from delivery** through the
**Add/Modify
Branches**
screen.
**Show orders**: It will show us the details of the selected order
through the **Order
details**
screen.
**Print orders**: It will print the details of the selected order.
**Unassign order**: Depending on the **Access
Level** to
the system we can unassign an order that had already been previously
assigned to a diriver.
**Checkout drivers**: It will allow us to checkout the selected driver
through the **Checkout
Drivers** screen.
**Give change**: It will allow us to give change to the selected driver
through the **Give Change to
Drivers**
screen.
**Assign vehicle**: It will allow us to assign a vehicle to the selected
driver from the **Vehicles
assignment**
screen.
**Tracking**: With this option, branches that have a hub installed, will
be able to see the tracking of the drivers.
------------------------------------------------------------------------
When an order is assigned to a driver, it will move automatically to the
bottom to the **Orders on delivery**, where some additional data will
appear:
**Status**: It will be always **“In delivery”** because when the order
will be delivered, it will disappear from **Orders on delivery**.
**Exit**: It will show the departure time of the driver.
**Time**: It will show the time that has passed since the driver has
left.
If the driver takes more time to come back from delivery, than the
average time the system has calculated, among the total amount of the
drivers in the same street or area, the order line will appear in red.
We can always check the **Order
details** by
clicking on the order line.
------------------------------------------------------------------------
Finally, at the bottom, we also have more options:
**ID or order number**: If we do not have a touch screen or do not want
to use the mouse, we can write the employee’s ID and the order number to
assign the order to a driver.
**Pending**: It will show us all the pending orders located in a map.
**Search**: It will allow us to search for an order through the **Search
Order**
screen.
**Update**: It will update all the changes in the orders, and it can be
very useful to see updated the production and delivery time of the
orders.
# Delivery Minutes
Once we have clicked on the **Clock** button located in the lower left
part of the screen, a window like the one we can see below will appear:

Here we can set the delivery minutes of the **Delivery** and **Pick-up**
orders. We have to take into consideration that the minimum time for
Delivery orders will be 30 minutes and to Pick-up orders will be 10
minutes.
We can also set these minutes from the **General
Options**
screen.
These minutes will affect the results of the **Production
Screen**.
Even if we change the delivery minutes from this screen, anytime we
start a new shift day the delivery minutes will be updated at the
delivery minutes that we have set on the **Add/Modify
Branches**
screen.
We can also stop the service to Delivery or Pick up from this screen,
unchecking the option Delivery or Pick up. We have to take into
consideration that if we stop the service of any of these order types,
the same service would also stop from the Web.
Once we have finished to set the delivery minutes, we will click on the
**Ok** button.
The **Cancel** button allows us to exit of the screen without making any
changes.
# Delivery Order Total
Once we have clicked on the **End** button through the **Place an
Order**
screen, when it is a delivery order, the following screen will appear:

At the top we will see the **Total amount**. Then the system will allow
us to choose between the different **Payment methods** that we have
configured from the **Order Payment
Methods**
screen. If the payment method is cash, we will ask the customer the
amount that is going to give us in cash in order to calculate the change
which has to take the driver, which will appear in the **Delivery
Orders**
screen.
Then, we will ask the customer if have received the flyer from our
business at home, to check if the
**Flyreying**
works properly.
If the customer has an SMS service provider which we will configure in
the **SMS
Settings**
screen, we would be able to send a warning SMS to the customer with the
driver departure.
Finally we will see the **Estimated Delivery time (Kitchen)** and the
**Estimated Delivery time (Deliveries)** which will be the average that
the system will calculate considering the last orders are taking. So, we
have to take into consideration the highest estimated time of the two
calculations made by the system, when we have to tell the customer when
will be ready the order.
Once we have finished, we will click on the **End** button.
The **Cancel** button allows us to exit of the screen without making any
changes.
# Orders
Once we have clicked on the Menu option **Orders-\> New Order** or on
the **New Order** icon in the main Menu, a screen like the one we can
see below will appear:
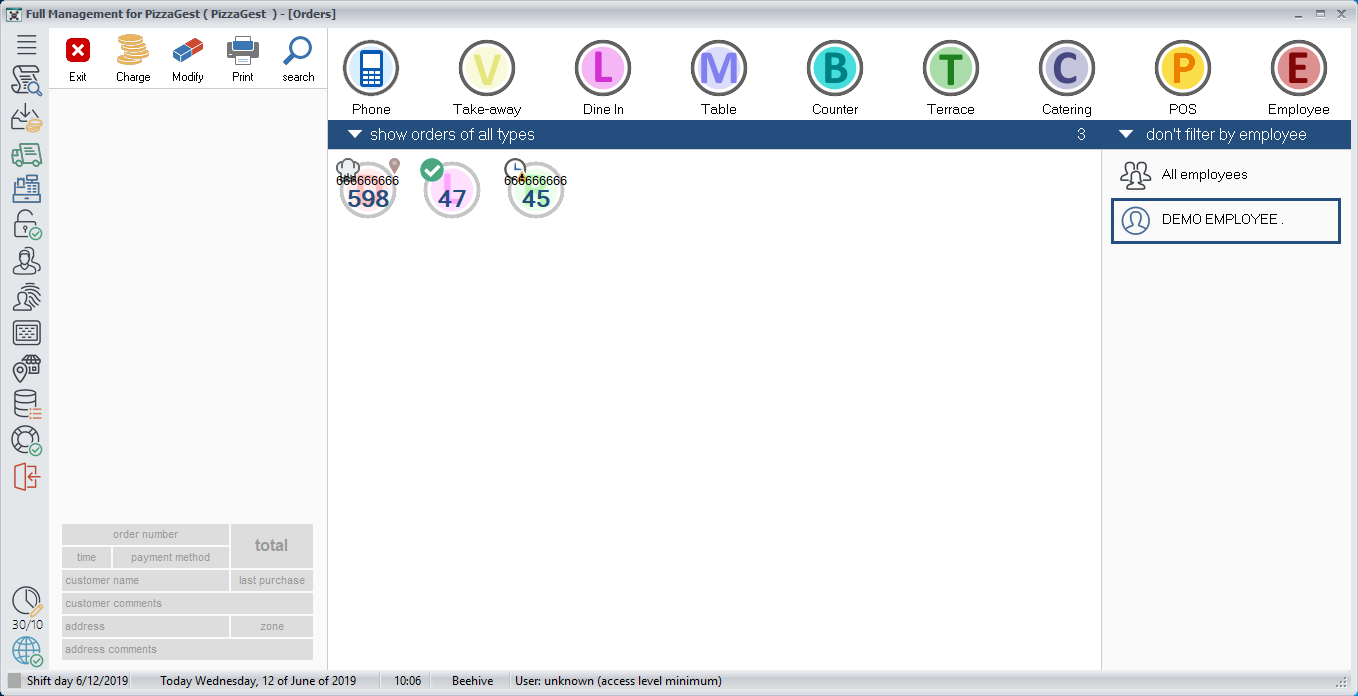
The first thing that we can see in this screen, will be in the central
part all the orders that are pending to pay. Depending on how we have
configured the option **Delivery confirmation is required for orders**
in the **General
Options**
screen, also orders that have already been charged may appear.
We can show orders of all types or don’t show delivery orders, and we
can also filter orders by employee.
**Orders pending to pay:**
They will appear with the order number and an icon above the order.
There are 3 different icons to distinguish the status of the order:

The icon with the **green V**, means that the order is ready and
produced.
The icon with the **Chef’s hat**, means that the order is still being
produced in Kitchen.
The icon with the **Clock**, means that the order has not yet arrived at
the delivery time. When the order approaches to the delivery time,
depending on how we have configured the **Delivery
Minutes** on
the clock button located at the bottom left of the screen, the order
will go to Kitchen and the icon will change to the Chef’s hat.
At any time we can select the orders that appear in the central part and
we will see on the left side of the screen the order’s detail. Besides,
when an order is selected, we have some buttons which allows us to
execute different functions, in the upper left side of the screen:

**Charge**: We will use this option to charge the order immediately. We
will have to enter the employee’s ID, if we have not chosen our name in
the list of employees, located on the right side of the screen. After
having applied the **Applicable
Promotions**,
we will click on Charge and we will see the **Charge
Order**
screen.
**Modify**: We will have to select an order and enter the employee’s ID,
if we have not chosen our name in the list of employees, located on the
right side of the screen and we will access to the **Place an
Order**
screen.
If we do not select any order and click on this button we can modify an
order of the same day even if it does not appear on the Orders screen.
If it is a Delivery or Pick-up order, we will have to enter the
customer’s phone number or the order number. For the rest of the order
types we will enter the order number.
If the order has been placed less than 15 minutes ago, any employee can
modify the order, but if this period of time has been exceeded, the
order can only be modified if the employee has the required **Access
Level** to
the system.
**Print**: This option will allow us to print the ticket of the order,
to give it to the customer, except if it is a delivery order, which must
be printed through the
**Delivery**
screen.
**Search**: It will allow us to search for the order by Customer Name,
Phone or Order Number. We have to take into consideration that if we
select a Pick-up order, this button will change to the **SMS** button,
which will allow us to send a message to the customers to let them know
that we have the order ready, as long as we have hired an SMS provider
and we have configured the data correctly on the **SMS
Settings**
screen.
**Orders that have already been charged:**
They will appear with the order number and an icon above of each order,
which will be the same icons that appear in the orders which are pending
to pay, although the colors of these orders will be inverted to
distinguish them from the orders that are pending to pay.
We may be interested in keeping the orders which have already been
charged, so in that way we can quickly check the order and verify that
we have delivered or served all the items that are part of the order.
Once the order is ready with the **green V** icon and we have finished
to serve or deliver the items, we will select the order and choose the
option **Deliver**, which will be the icon that will appear in the top
left part of the screen and it will replace the **Charge** option. Once
we have made the delivery confirmation, the order will disappear from
the screen.
------------------------------------------------------------------------
The way to place an order is similar for all types of orders.
To place an order, we should first check that we are placing the order
with our employee name, we can check it in the list of the right side,
if we want to avoid that the system ask us for the our employee’s ID.
Previously we have to **Clock
In**.
After, we must choose the type of order among the next ones:
**Phone**: Will be the orders placed by phone, either for **Delivery**
or to **Pick-up** in the store. Once we click on this option and we have
entered the customer’s phone, except for the customers who have Caller
ID installed, the following screen will appear::
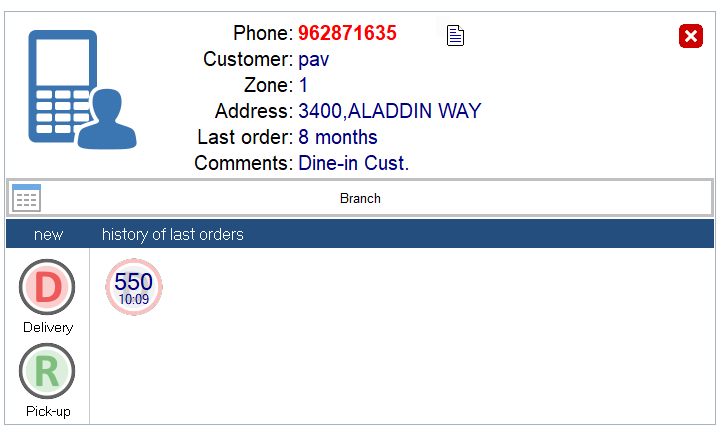
In this screen we can see the customer’s data and the last purchases of
the customer that has made. Then we must choose between whether the
order is **Delivery** or **Pick up**. Once we have chosen the proper
option, we can **Place the
order**.
If the customer is still not registered in our database, we will have to
register it or at least choose an address, through the **Customer
Management**
screen.
**Take-away**: Will be the orders placed in the store to Take-away. Once
we click on this option, we can **Place the
order**.
**Dine In**: Will be the orders that the customers place in the store,
and the same customers will take the items to the table and pay at the
moment of **Placing the
order**.
**Table, Counter and Terrace**: Will be the orders that the customers
place so that we take the items to the table, counter or terrace, and
the ones which the customers won’t normally pay at the time of placing
the order. The reason to distinguish among these 3 options, is so that
if we wish we can set different prices for each type of order, depending
of how we have configured it though the **Add/Modify Sales
Items**
screen. Once we have chosen, the number of the table, counter or
terrace, we can **Place the
order**.
We have to take into consideration that the number range of tables,
counters and terrace will be configured through the **Add/Modify
Branches**
screen.
**Catering**: It is normally used for celebrations in which we can
configure special **Sales
Promotions**.
Moreover when we finish to place the order, the system will ask us if we
want to print the kitchen chits, because there are usually many
repetitive orders, and in this way we can save a lot of paper.
**POS**: It is used for orders which are placed in the store, usually in
a small place like a Coffee shop where the orders are usually
repetitive. Choosing this option, at the end of the order the system
returns to the same screen to place the order as a POS order, without
having to choose again the same option, and we can **Place the
order**.
**Employee**: It is used for orders that are placed by the employees and
may have configured a **Sale
Promotion**.
The system will ask us for the Employee’s ID as a customer and once we
have entered it, we can **Place the
order**.
We have to take into consideration that we can configure the employee’s
maximum daily expense through the **Add/Modify
Branches**
screen.
# Notifications

# Customer Screen
# Kitchen Screen
Una vez hayamos pulsado dentro del Menu **Pedidos-\>Pantalla Cocina**
aparecerá una pantalla como la que puede ver a continuación:

Para activar como Pantalla de cocina, la opción “Pedidos” en “Tipos de
vista” en la parte inferior izquierda de la pantalla deberá estar
activada.
Para ver solo el número de línea correspondiente de cada artículo y no
la descripción del artículo, la opción “Ver descripción” en “Opciones”
en la parte inferior derecha de la pantalla debe estar desactivada.
La línea con color de fondo rojo indica que se ha excedido el tiempo de
producción (especificado en cada grupo familiar).
La línea con color de fondo amarillo indica que los cambios se pueden
deshacer.
La línea con el color de fuente negro indica que está inactivo.
La línea con el color de fuente azul indica que la producción ha
comenzado.
La línea con el color de fuente rojo indica la producción esta terminada
y en el horno.
La línea con color morado indica que el empaquetado está terminado.
Si hace clic sobre la línea gris del pedido, todo el pedido se marcará
como producido y se mostrará en la pantalla de embalaje.
------------------------------------------------------------------------
*Falta añadir captura de pantalla de la versión nueva con todos los
detalles descritos en el documento de ayuda*
------------------------------------------------------------------------
Para activar como pantalla de empaquetado, la opción “Empaquetado” en
“Tipo de vista” en la parte inferior izquierda de la pantalla deberá
estar activada.

La pantalla de empaquetado solo muestra el pedido una vez que se ha
producido al menos un artículo y permanece hasta que todos los artículos
hayan sido empaquetados.
En caso de hacer clic en la línea gris de cada pedido, todo el pedido se
marcará como empaquetado (terminado) y desaparecerá de la pantalla.
El número que aparece al principio de la linea es el tiempo transcurrido
desde que terminó la producción del pedido hasta que el embalaje
terminó.
Si la opción “Pedido” está activada en **Clic sobre** al hacer clic en
cualquier lugar del pedido, se marcará como empaquetado.

Dentro del a Pantalla de Cocina tenemos una barra de Control con
distintas opciones:

Los primeros 2 botones, con las **flechas hacia ambos lados**, son para
mover los pedidos hacia la derecha o la izquierda, según nos interese.
Los botones con los signos de **+** y **-** sirven para aumentar o
disminuir el tamaño de la fuente.
El siguiente botón, con **2 flechas en forma de circulo**, servirá para
actualizar la pantalla.
A continuación, el botón con la **flecha curvada hacia la izquierda**
nos permitirá deshacer el último cambio que hayamos realizado.
Para terminar, tenemos el botón **rojo** para salir de la pantalla.
**Configuración recomendada**
La configuración habitual para la pantalla de la cocina (cocina sin
papel), es tener 1 pantalla en la etapa de elaboración, otra en el horno
y otra en la etapa de embalaje, después del horno (mesa de corte).
Los ajustes para cada pantalla son:
Etapas de eleboración y de horno:
Tipo de vista: **Pedidos**
Clic sobre: **Pedido**
Opciones: Tendremos que marcar, **Ver descripción** y **Ver
ingredientes**.

Primero, haga clic sobre cualquier artículo para cambiar el color a
azul, que significa “bajo elaboración”.
Si hace un segundo clic sobre cualquier artículo, cambiará de color a
rojo, que significa “en el horno”.
Una vez que todos los artículos para el mismo pedido estén “en el
horno”, desaparecerán de esta pantalla y aparecerán en la Pantalla de
Embalaje.
Etapa de embalaje (después del horno):
Tipo de vista: **Empaquetado**
Clic sobre: **Pedido**
Opciones: Tendremos que marcar, **Ver descripción** y **Ver
Empaquetado** (es obligatorio).

Si hacemos un tercer clic sobre cualquier artículo, cambiará de color a
púrpura, que significa “empaquetado”.
Una vez que todos los artículos para el mismo pedido sean de color
púrpura, la orden desaparecerá de la pantalla de Embalaje.
# Production Screen

# Budget monitoring
Una vez hayamos accedido a la opción del Menú **Pedidos→Seguimiento de
Presupuesto** aparecerá una pantalla como la que podemos ver a
continuación:

Esta pantalla nos sirve para hacer una previsión de ganancias
(presupuesto), por adelantado de cada mes y después revisar si hemos
llegado al presupuesto estimado.
**-Filtro-**
En este apartado podemos elegir la fecha de inicio y la fecha de fin, de
la lista de días que nos aparecerá en pantalla, donde podremos comprobar
si estamos cumpliendo el presupuesto que hayamos generado previamente.
Hay que tener en cuenta que para que aparezcan los días en la lista,
deberemos haber generado el presupuesto previamente, de los días que
queremos consultar, con el botón **Generar Presupuesto**.
A continuación, veremos la lista de los días que hayamos seleccionado en
el filtro, donde aparece la siguiente información:
Fecha: En este campo aparecerá la fecha de cada día que aparece
en la lista.
Venta Estimada: En este campo introduciremos la venta estimada
que pensamos que vamos a realizar en el día correspondiente y pulsaremos
Intro. Si ya hemos introducido el valor de la venta estimada previamente
y hemos accedido para hacer una consulta, aparecerá el último valor que
hayamos introducido.
Venta Real: En este campo aparecerá el importe total de la venta
real que hemos realizado en el día correspondiente.
Diferencia: Aquí aparecerá la diferencia entre la venta estimada
y la venta real. Si la diferencia es negativa aparecerá con un fondo
rojo y si es positiva aparecerá con el fondo verde.
Acumulado: En este campo se irán sumando o restando según
corresponda, las diferencias de cada día que aparezca en la lista de
días que hayamos seleccionado en el filtro.
**-Totales-**
Debajo de la lista de los días que aparecen, según hayamos configurado
el filtro, aparecerán tres casillas con los totales de la venta
estimada, venta real y diferencia, de los días correspondientes.
------------------------------------------------------------------------
En la parte derecha, tenemos varios botones que nos permiten realizar
distintas funciones:
**Generar presupuesto**: Si pulsamos este botón, podemos generar el
presupuesto de un mes concreto desde la pantalla **Generar
Presupuesto**
**Informe**: Si pulsamos este botón, nos sacará un
**Informe**
del presupuesto de los días que hayamos configurado en el filtro.
# Daily Reports
Una vez hayamos accedido desde la opción del menú **Pedidos-\>Listados**
aparecerá una pantalla como la que podemos ver a continuación:

En esta pantalla, eligiendo la fecha de inicio del informe y la fecha de
fin del informe, podemos ver los siguientes tipos de informes:
**Por Ventas**
Informe de Ventas: Extracto de todas las ventas efectuadas
durante las fechas seleccionadas.
Informe de Gastos: Extracto de todos los gastos ocasionados
durante las fechas seleccionadas.
Informe de Formas de pago: Extracto de todos ingresos que hemos
recibido, separado por las formas de pago, durante las fechas
seleccionadas.
Informe de Cambio devuelto: Extracto del cambio devuelto durante
las fechas seleccionadas.
Informe de arqueos: Nos devuelve un informe más completo, donde
podemos ver las aperturas y cierres de caja, las ventas realizadas por
pedidos, los ingresos que hemos recibido, un resumen de importe de las
cajas y el cierre de caja con el fondo que hemos dejado en caja, durante
las fechas seleccionadas.
**Por Incidencias Pedidos**
Informe de pedidos descartados: Extracto de todos los pedidos
descartados durante las fechas seleccionadas, separados por ámbito.
Informe de pedidos anulados: Listado de los pedidos anulados,
durante las fechas seleccionadas, separados por ámbito.
Informe de pedidos modificados: Extracto de los pedidos
modificados durante las fechas seleccionadas, separados por ámbito.
Informe de Invitaciones: Extracto de todas las invitaciones
efectuadas en los pedidos, durante las fechas seleccionadas.
Informe de Multas-Descuentos: Extracto de todas las multas y
descuentos efectuados en los pedidos, durante las fechas seleccionadas.
**Por Pedidos**:
Informe de todos los pedidos: Listado de todos los pedidos
efectuados en las fechas seleccionadas, agrupados por ámbito.
Informe de todos los pedidos por orden: Listado de todos los
pedidos efectuados en las fechas seleccionadas, ordenados por fecha y
hora.
Informe del registro IVA/IGIC: Nos mostrará un listado de todas
las facturas (pedidos) que hayamos efectuado durante las fechas
seleccionadas, con el número de factura correspondiente. A continuación,
cuando cerremos este informe aparecerá automáticamente el informe de
facturas rectificativas, que serán básicamente los pedidos en negativo
que hemos anulado o en los que hemos hecho alguna invitación.
Informe de todos los pedidos por tiempos: Listado de todos los
pedidos efectuados en las fechas seleccionadas, agrupados por ámbito, en
los que nos mostrará los tiempos de producción en cocina y los tiempos
de entrega.
**Por Repartos (solo Domicilio)**:
Informe de repartos retrasados: Listado con todos los pedidos de
domicilio efectuados en las fechas seleccionadas, que han llegado con
retraso, indicando el tiempo de retraso, considerando el tiempo de
entrega seleccionado en el campo **Tiempo máximo de entrega**.
Informe de todos los repartos: Listado de todos los pedidos a
domicilio, efectuados en las fechas seleccionadas, indicando el tiempo
medio de reparto.
Informe de las incidencias: Listado de las incidencias que ha
habido en los pedidos, efectuados en las fechas seleccionadas.
# Report of Average Order Prices of Catering Customers

# Report of Average Order Price

# Report of Average Orders Taken

# Order Cancellation
Once we have clicked on the **Cancel** button through the **Check
Order**
screen, we will see a screen like the one we can see below:
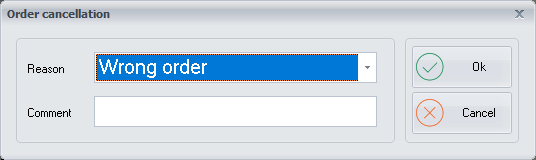
Here we have to choose from the drop-down list the reason for cancelling
the order, if we wish we can write a comment and click on the **OK**
button. Then, the system will warn us that the order has been cancelled
and if the order is from the current day, a chit kitchen will be sent by
all the kitchen printers to the kitchen staff, so that they do not
produce the order.
We can configure the dropdown list with all the cancellation reasons,
through the screen**Cancellation
Reasons**
The **Cancel** button allows us to exit of the screen without making any
changes.
# Charge Order
Once we have clicked on the **Charge** button through the **Applicable
Promotions**
screen or the **Change payment method** button through the **Check
Order**
screen, the following screen will appear:
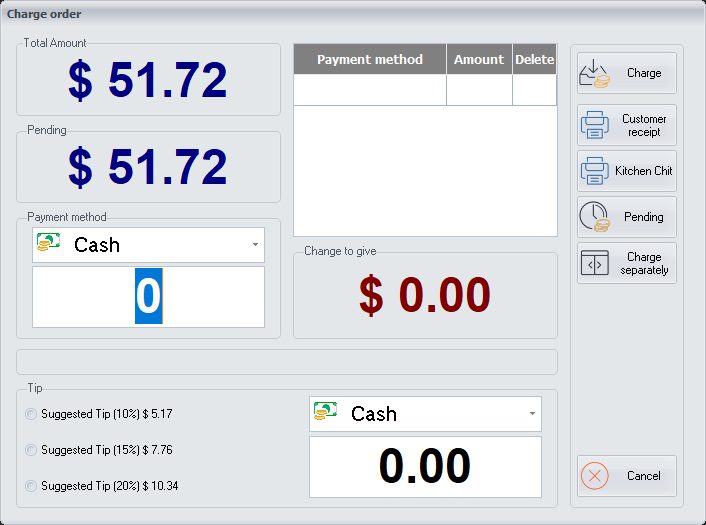
In this screen we can see the **Total Amount** of the order and the
**Pending Amount**, depending on the amounts that we are adding in the
lower part in **Payment method**.
The system will allow us to choose between the different **Payment
Methods** that we have configured through the **Order Payment
Methods**
screen. We can add the total amount of the order in just one payment
method or in more than one payment methods.
If we choose the **Invitation** payment method we can invite the
customer to the whole order if we have the the required **Access Level
Definition**
to the system.
Anytime we choose a payment method, we must enter the amount that we
will be paid in that payment method and press Enter.
The amounts that we are introducing with the different payment methods,
will be added in the central part and if the addition of all the amounts
added exceed the total amount of the order, the **Change to give** will
appear just below.
Once we have introduced some payment method with its corresponding
amount, the order cannot longer be canceled. Therefore, if the order
eventually will not be placed, it should be canceled later.
If it is a **Dine In, Table, Counter or Terrace order**, the **number of
guests** and the **price to be paid per guest** will appear at the
bottom.
On the other hand, we can choose the tip that the customer is going to
pay among the suggested tips which appear at the bottom. We have to take
into consideration, that the tip payment method could be different from
the order payment method.
On the right side, we have several buttons that allow us to execute
different functions:
**Charge**: We will use this button to charge the order, once we have
entered enough amount to make the payment of the order with any payment
method.
**Customer receipt and Kitchen chit**: We can deactivate any of these
two options, if we do not want print the customer receipt or the kitchen
chit. In order to do it, we must click on the corresponding button and
after confirming it, we will see how the name of the button changes to
**No customer receipt** or **No kitchen chit**. If we deactivate any of
these two options, they will keep deactivated for the following orders
until we activate them again.
**Pending**: We can leave the order as pending and the whole order will
be sent to the kitchen staff and the order will be pending on the
**Orders**
screen.
**Charge separately**: It allows us to charge the order separately,
choosing the items on different tickets through the **Split
order**
screen.
**Cancel**: It allow us to exit of the screen without making any
changes.
# Choose Location
If we click on the **Add** button through the **Locations for
Items**
screen, a window like the one we can see below will appear:
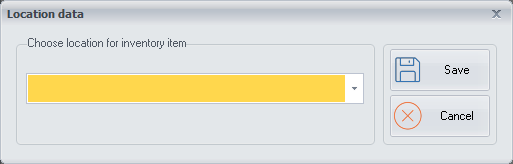
We can choose a location where the inventory item is stored from the
drop-down that will be configured through the **Inventory Items
Location**
screen.
# Order Details
If we double click on any order line in the **Pending orders** or once
we have clicked on the **Show order** button, or if we click on the
order line in the **Orders on Delivery** through the **Delivery
Orders**
screen, a screen like the one we can see below will appear.

Here we can see in the central part the **Order data**, the **Branch**
from where the order was placed and the **Customer data** that has
placed the order.
In the right part, we have several buttons which allow us to make
different functions:
**Locate**: It allows us to see on the map the route of the order from
the departure point to the destination point. If the map does not show
the right route, it may be because the name of the street we have saved
in the
**Streets**
screen is different from the one that has the map configured. So, in
order to the map recognize the street we will have to modify the name of
the street from the **Add/Modify
Streets**
screen.
**Print**: It will allow us to print the order details.
**Print map**: It will show us the customer address on the map.
**Customer**: It will show us the customer data through the **Customer
Management**
screen.
**Employees**: It will show us the employees who have intervened in the
order, the **operator** and the **driver**.
**Copy source**: It will copy the source address of the order to the
Windows clipboard.
**Copy destiny**: It will copy the destiny address of the order to the
Windows clipboard.
**Unassign**: According to the **Access
Level** to
the system we can unassign an order that has already been previously
assigned to a driver.
# Order penalty or Discount
Once we have clicked on the **Order penalty** button through the **Check
Order**
screen, or on the **Discount** button through the **Applicable
Promotions**
we will see a screen like the one we can see below:

Here we must write the reference for the penalty or discount, enter the
amount in cash or in percentage and press **OK**
We can check all orders with penalty or discount, through the **Daily
Reports**
screen.
The **Cancel** button allows us to exit of the screen without making any
changes.
# Place an Order
Once we have chosen the order type we want to place through the
**Orders**
screen, a screen like the one we can see below will appear:
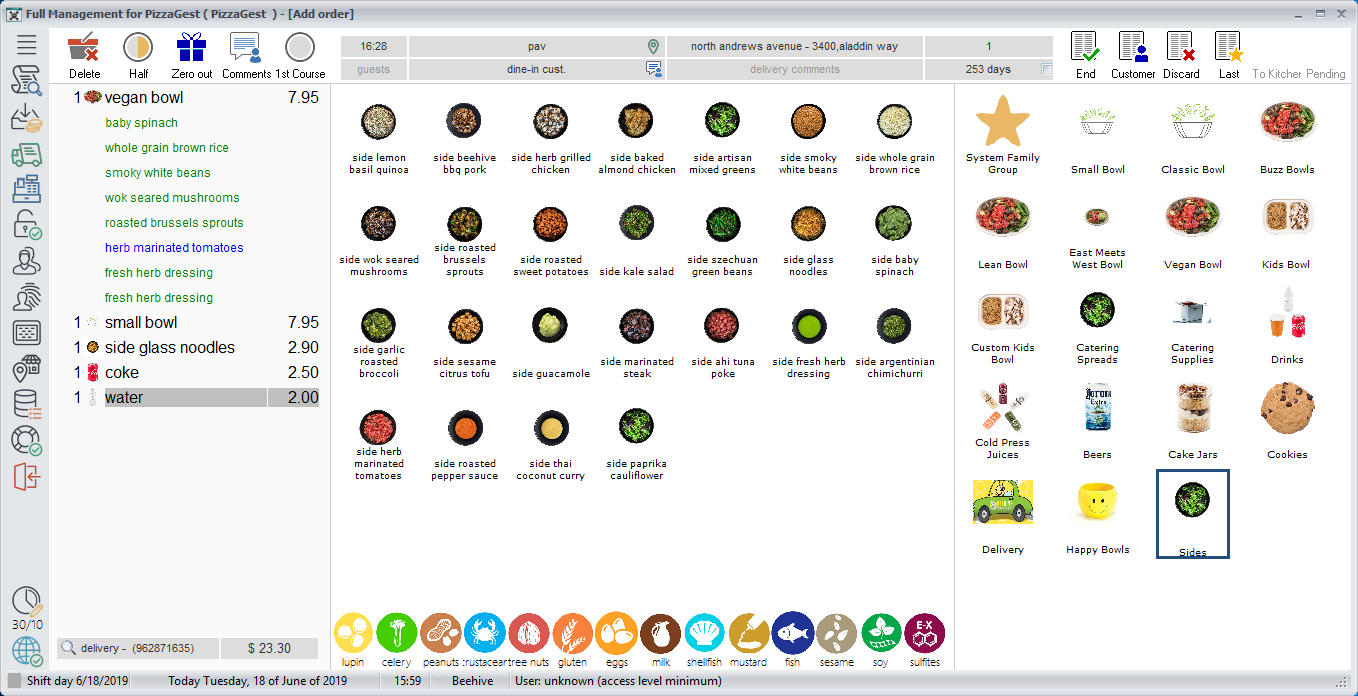
To place an order, we must first choose the items from the right side,
which are classified by **Family
Groups**.
Each time we click on a Family Group, all the **Sales
Items**
of each Family Group will appear in the centre.
If we wish that the system does not allow us to add to the order any
item that contains any type of allergen, we will have to select the
proper allergen among the icons that appear in the centre below. In this
case, the items which contain the allergens that we have selected, will
appear with a forbidden sign and the system won’t allow us to add them
to the order.
We have to take into consideration that we can set the allergens through
the
**Allergens**
screen.

We have 2 options to add an item to the order:
**1)** We can select the item with the right mouse button, in this way
the item is added directly to the order, with the configured
**Recipe**
of each article.
**2)** The other option is to select the item with the left mouse
button, and in this case if the item has no recipe, it will be added
directly to the order. In case the article has a configured recipe, the
article will appear with the recipe ingredients selected, but we will
have the option to modify and add ingredients, which will be classified
by columns, that will be the **Inventory Items
Grouping**.
We will see a screen like the one you can see below:
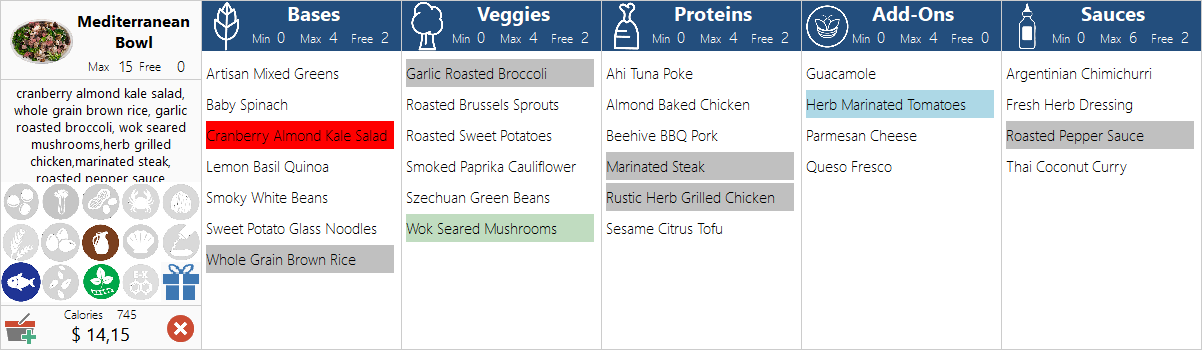
If we do not change anything, the **ingredients that are configured in
the recipe** will appear with a **grey background line**.
If we want to **add an ingredient**, we will click on the corresponding
ingredient and the selected ingredient will appear with a **blue
background line**, which means that it is an extra ingredient.
If we want to add a **double ingredient**, we will have to double click
on the corresponding ingredient, either an ingredient is configured by
default in the recipe or it is an extra ingredient. When
double-clicking, the double ingredient will have a **green background
line**.
On the other hand, if we want to **remove an ingredient** that is
configured by default in the recipe, we will have to click on the
ingredient that comes with a grey background line and the **background
line will change to red**, and this ingredient won’t longer be added to
the item.
All the ingredient changes that we can make, may change the price of the
article, which we can see in the lower left part of the screen. This
possible change of the price, will depend on how we have configured the
**Inventory Items of Family
Group**.
In case we have the required **Access Level
Definition**
to the system, we can **invite to ingredients**, by pressing the blue
button of the gift package and then we will click on the ingredients
that we want to invite and these ones will appear with a **yellow
background line**.
Also in the lower left part of the screen, the corresponding allergens
of each item that we have configured in the
**Allergens**
screen will be activated.
If there is a sale item that we can offer to the customer and it is not
included in the Menu, we can add it as **Star Item**, in order to do it,
we must choose in the right side the \*\* System Family Group \*\* and
we will see an icon with a star shape in the centre. If we click on the
icon star, we can put a name and price to the \*\* Star Item\*\* and it
will be added to the order (E.g. fried egg). We have to take into
consideration that in order to use the **Star Item**, the employee who
place the order must have the required level in the function “Sale
system items” in the **Access Level
Definition**
screen.
If we want to add several equal items, we can first add only one, and
then modify the quantity, by clicking on the number that appears in
front of each item added to the order.
------------------------------------------------------------------------
Once we have chosen any article and it appears in the left part of the
screen, we will have some buttons that will help us to configure the
order, these options are located in the upper left part of the screen:

**Delete**: Once we have selected the item that we want to delete from
the order, we will click on the **Delete** button and the item will
disappear from the order. In case the quantity of the item is more than
one, the quantity will decrease one by one.
**Half**: If we want to be able to choose half of the item with some
toppings and the other half with other toppings, we must add the two
items in a row, select the one below and click on the **Half** button.
At that time we can see how the word HALF is added before the name of
the two items. We have to take into consideration that in order to
choose an item as Half, we must activate the corresponding option from
the **Add/Modify Major
Groups** screen.
**Zero out**: In case we have the required **Access Level
Definition**
to the system, we can invite an item from the order, by clicking the
**Zero out** button. If we use it, we will see that the price of the
selected item changes to 0.
**Comments**: If we select an item, and click on the **Comments**
button, we can add a comment for the kitchen staff, since these
observations will appear on the kitchen chit. For instance, the meat is
well done. It is only possible to add one observation per item. We can
write a new comment, or choose one from the list that we can
configure from the **Preparation
Comments**
screen. We have to take into consideration that we can only add comments
on **Sales
Items**
that belong to a **Family
Groups**
which has a printer associated on the **Add/Modify Family
Groups**
screen.
**Courses**: We can use this option in order to configure as the
Starter, First course, Second course or Dessert, the selected item. It
will be very useful for the kitchen staff to prepare the dishes
properly, and also for the waiters when taking orders from the PDA.
We have to take into consideration that while we are placing the order
and we have not yet sent it to the kitchen staff, we will have the
option of **changing the type of Order** from Dine In to Take-away or
vice versa and from Delivery to Pick-up or vice versa, clicking on the
line located next to the total price of the order, in the lower left.
------------------------------------------------------------------------
Up in the center, we can see some details of the order:

**Delivery time of the order, Customer name, Customer address, Postal
Code or Zone, Number of guests, Customer comments, Delivery observations
and the latest Customer order.**
We can edit and modify all these data clicking on the corresponding
data.
------------------------------------------------------------------------
Finally, once we have finished to place the order, we have some options
to end the order, these functions are located in the upper right part of
the screen:

**Charge or End**: We will use this option to charge the order and after
having applied the **Applicable
promotions**,
if applicable, we will click on **Charge** and the **Charge
Order**
screen will appear. If it is a Delivery or Pick-up order, this option
will appear with the name **End** and we will **Charge** the order
through the **Delivery Order
Total**
screen.
**Customer**: It allows us to select a customer that already exists or
create a new one through the **Search for
Customers**
screen.
**Discard**: It allows us to discard a complete order that we have not
yet charged. After confirming to the system that we want to discard the
order, all the lines of the order will be deleted and we will return to
the
**Orders**
screen
**Last**: If we have previously selected a customer through the **Search
for
Customers**
screen, the latest order placed by the selected customer will appear.
When the latest customer order appears loaded, we can mark above the
items that the customer wants to order again and we can see how an
asterisk \*\*\*\*\* is added in each article that we select. So, when we
have finished marking the corresponding items, we will click on the
**Green V** icon that appears below the order. Once we have validated
the items that the customer wants to repeat of his last order, we can
continue adding other items or end the order.
On the other hand, if we want to delete all the lines of the order that
have appeared on the screen, we can clean the order by clicking on the
**Red X** icon located at the bottom.
**To Kitchen**: In order to get a jump on work, the order is sent to the
kitchen staff although the order has not been ended. The order will be
pending on the
**Orders**
screen.
**Pending**: The whole order is sent to the kitchen staff, but the order
will be pending on the
**Orders**
screen.
# Search Order
Once we have clicked on the **Search** button through the **Delivery
Orders**
screen, a screen like the one we can see below will appear.
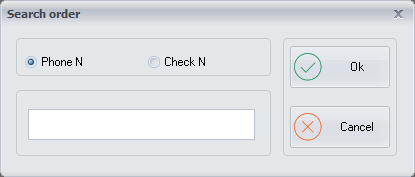
From this screen we can search for orders by **phone number** or by
**order number**.
The **Cancel** button allows us to exit of the screen without making any
changes.
# Split order
Once we have clicked on the **Split check** button through the **Charge
Order**
screen or the **Applicable
Promotions**
screen, the following screen will appear:
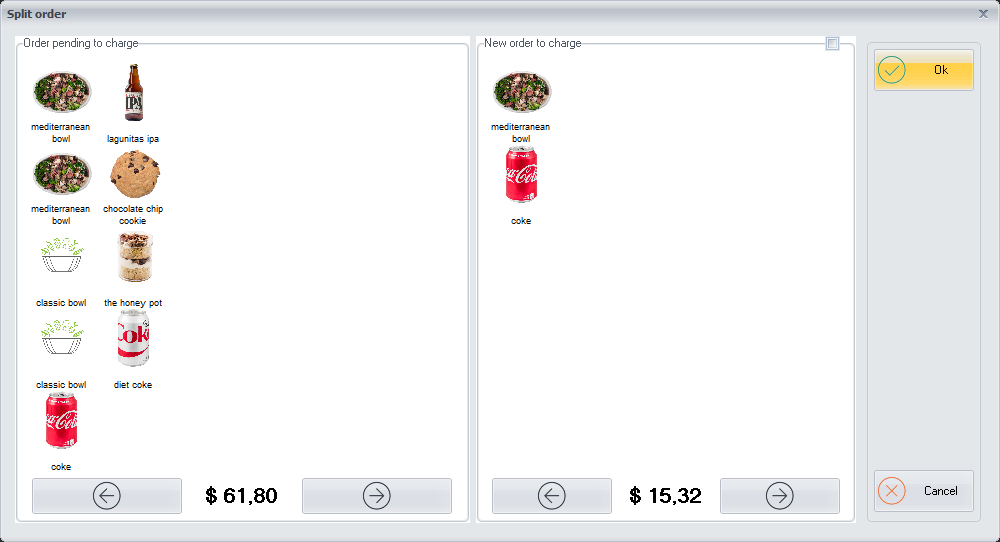
In this screen we can see on the left all the items of the order,
located in the **Order pending to charge** box. So, in order to charge
an item separately, we must select the corresponding items and they will
automatically move to the right in the **New order to charge** box.
If we make a mistake including an item to the **New order to charge**
box, we can move it back to the **Order pending to charge** box by
selecting the item again.
Once we have selected the items we wish to charge separately, we will
click on the **Ok** button and we will return to the **Applicable
Promotions**
screen.
We can charge separately as many times as there are items in the order,
but when we charge the item separately the customer may not take
advantage of some
**Promotion**
that could benefit from charging the whole order in just one time.
They will be created as many tickets as groups of items that we have
charged separately, and the main ticket will consist of all items that
have not been paid separately and remain on the **Order pending to
charge** box.
The **Cancel** button allows us to exit of the screen without making any
changes.